Mastering Creature Design with the Horns and Spikes Brush Set
Adding organic, menacing, or fantastical details to character designs often becomes the bottleneck in digital illustration. Many artists spend hours manually painting individual scales, horns, or spikes, only to find the results look repetitive or flat. This is where a specialized tool like the Horns and Spikes Brush Set changes the workflow entirely. It is not merely a collection of stamps; it is a comprehensive system designed to accelerate the concept art, matte painting, and sketching phases while maintaining artistic control.
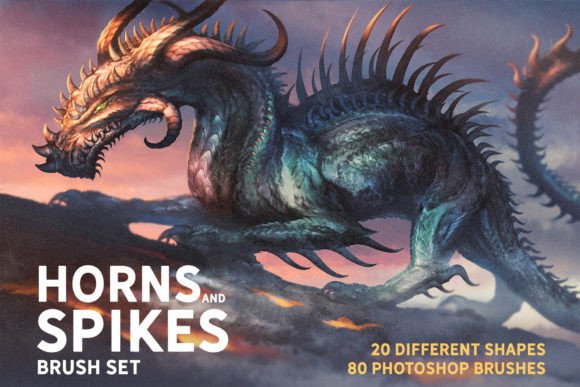
However, simply downloading a new brush pack does not guarantee better art. In fact, many creators make critical errors when integrating these tools into their pipeline, leading to artwork that looks generic or "brush-heavy." Understanding how to properly leverage this set—comprising 80 different brushes across 20 unique shapes with four variations each—requires a shift in mindset from passive stamping to active painting.
Misunderstanding the Tool: Stamps vs. Paint Brushes
The most common mistake artists make with the Horns and Spikes Brush Set is treating every brush as a simple overlay stamp. While the set includes stamp-like functionality for quick placement, its true power lies in its ability to function as actual paint brushes. When users rely solely on clicking to place a horn or spike, they lose the organic flow that comes from hand-drawn strokes. This results in creatures that look assembled rather than grown, breaking the immersion for the viewer.
To avoid this sterile look, you must engage with the pressure sensitivity and tilt features of your tablet. Use the brushes to paint in the direction of growth. For example, when adding spines to a dragon’s back, do not just click along the spine line. Instead, drag the brush to create a tapering effect that mimics natural keratin growth. This approach integrates the detail into the underlying form, ensuring that lighting and perspective remain consistent. The set is ideal for sketches because it allows you to block out complex textures rapidly without sacrificing the gestural energy of the initial drawing.
Overlooking Variation and Repetition
Nature is rarely uniform, yet digital tools often encourage symmetry and repetition. A significant pitfall when using any specialized brush set is failing to utilize the included variations. The Horns and Spikes Brush Set provides four distinct variations for each of the 20 shapes. Ignoring these variations and sticking to a single favorite brush will make your creature design look artificial and computationally generated.
Consider the texture of a rhinoceros beetle versus a sea urchin. Both have spikes, but the arrangement, thickness, and curvature differ vastly. By rotating through the four variations, you introduce the necessary chaos that defines organic life. If you are working on a matte painting, this variation is crucial for breaking up tiling patterns in the background elements. A practical tip is to assign different variations to different layers or use them intermittently within a single stroke. This subtle shift prevents the viewer’s eye from catching a repetitive pattern, thereby enhancing the realism and quality of the final piece.
Compatibility and Technical Setup Errors
Before purchasing or downloading, many users overlook the technical requirements, leading to frustration during installation. The Horns and Spikes Brush Set is compatible with Photoshop CC and Procreate 5.0, which covers the majority of professional workflows. However, users of Clip Studio Paint and Affinity Photo often assume native support without checking version constraints. You can import the .abr files into Clip Studio Paint v1.10.5 or newer and Affinity Photo, but older versions may fail to recognize the brush dynamics or pressure curves.
Failing to update your software before importing can result in brushes that appear as basic circles or lack the intended texture. Always verify your software version first. Additionally, when importing into non-Adobe platforms, you may need to adjust the brush settings manually to match the original intent. For instance, the spacing and scatter settings defined in Photoshop might not translate perfectly to Procreate. Taking ten minutes to recalibrate these settings ensures that the brushes perform as expected, saving you from hours of troubleshooting later.
Ignoring the Foundation: Base Shapes and Anatomy
A frequent error among beginners is applying detailed brushes over poorly constructed underlying forms. No amount of high-quality horn textures can save a creature if the anatomical structure beneath is flawed. The Horns and Spikes Brush Set is designed to add extra details, not to define the primary silhouette. If you skip the sketching phase and jump straight to detailing, the result will look pasted-on and disjointed.
Use the brushes as a good base for illustrations, but always start with a solid gesture drawing. Establish the volume and light source first. Once the form is clear, use the brushes to enhance the surface texture. For concept art, this method allows for rapid iteration. You can test different horn placements on a basic sphere or cylinder to see what reads best from a distance. This iterative process helps you avoid committing to details that do not serve the overall design, improving both efficiency and communication with clients or art directors.
Enhancing Your Workflow with Complementary Tools
While the Horns and Spikes Brush Set is powerful on its own, limiting yourself to a single toolset can restrict your creative potential. Professional artists often combine multiple specialized brushes to achieve complex surfaces. For instance, the cover image for this set was created using additional brushes from the Awesome Brushes Bundle, specifically the Dragon Scale Brush Set. Combining spikes with scales creates a more believable hybrid creature, adding depth and visual interest.
When evaluating your toolkit, consider how different textures interact. Scales might cover the body, while spikes protrude from the joints or spine. Using complementary sets allows for a more nuanced approach to creature design. It also prevents the "one-trick pony" effect, where every creature looks like it belongs to the same species simply because the same brush texture is visible everywhere. Diversifying your brush usage leads to richer, more varied portfolios that appeal to a broader range of clients, from game studios to publishing houses.
Final Considerations for Buyers and Users
Before making a decision to integrate this set into your daily workflow, assess your current project needs. If you frequently design monsters, dragons, or armored characters, this tool is an investment in speed and consistency. However, if your work focuses primarily on soft landscapes or human portraits, the utility may be limited. Always align your tool purchases with your artistic goals.
Remember that these brushes are aids, not replacements for skill. They require practice to master. Spend time experimenting with opacity, flow, and layer modes. Multiply and Overlay modes can dramatically change how the spikes interact with underlying colors, offering endless possibilities for shading and highlighting. By approaching the Horns and Spikes Brush Set with a willingness to learn and adapt, you transform it from a simple download into a cornerstone of your digital artistry.